Showing posts with label Dota-Allstars Guides. Show all posts

Rhasta - The Shadow Shaman, DotA Hero Strategy Guide
IPB Image

Rhasta is a very flexible and versatile hero. He is the only natural pusher, support caster and hero killer all rolled into one malnourished frame. The best disabler in the whole game of dota. But, you'll be needing to hone your ward trapping skills to use him efficiently.


-Hero Wiki-
RhastaRhasta - The Shadow Shaman
Range: 550 | Move Speed: 285
Primary: INT
Str: 16 + 1.6 | Agi: 16 + 1.6 | Int: 21 + 3
Damage: 42 – 49 | HP: 454 | Mana: 273
HP Regen: 0.73 | Mana Regen: 0.85
Attack Speed: 1.43 | Armor: 1
Forked Lightning Forked Lightning
Calls forth a cone of lightning, hitting multiple enemy units for damage.
Level 1 95 - 75 damage to 3 targets.
Level 2 105 - 150 damage to 4 targets.
Level 3 135 - 225 damage to 5 targets.
Level 4 160 - 300 damage to 7 targets.

Voodoo Voodoo
Transforms an enemy unit into a random critter, disabling special abilities.
Level 1 110 - Lasts 1 seconds.
Level 2 140 - Lasts 2 seconds.
Level 3 170 - Lasts 3 seconds.
Level 4 200 - Lasts 4 seconds.

Hero Shackles Hero Shackles
Magically binds a target enemy, so that it cannot move or attack and deals 40 damage per second.
Level 1 110 - Lasts 2.5 seconds.
Level 2 130 - Lasts 3.25 seconds.
Level 3 155 - Lasts 4 seconds.
Level 4 185 - Lasts 4.75 seconds.

Mass Serpent Ward Mass Serpent Ward
Summons 8 immobile serpentine ward to attack enemies. The ward is immune to magic.
Level 1 200 - Deals 43 max damage.
Level 2 350 - Deals 58 max damage.
Level 3 610 - Deals 73 max damage.

-Skill and Item Build-
IPB Image


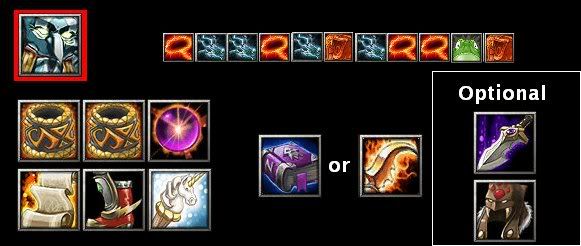
Forked Lightning is maxed out ASAP, as Shackles costs a lot early, and the extra milliseconds of disable do not matter as much as +75 damage.
Voodoo is taken only at level 9 and then maxed. It costs too much mana early. Ultimate is taken whenever possible.

Point Booster gives plenty of survivability, which is essential for Rhasta. It is much better than having four Bracers, as they consume a lot of space.

HoD is got versus heavy damage nukers. Blink is taken if you've problems with placing Serpent Wards and/or Shackles. As Keritzel and totalnewbie pointed, the nerfed Blink has very limited uses, for escaping isn't an option.

Book and Guinsoo's both give you great stats and active abilities. If you need a fourth (blink.gif) disable after Eul's go for Guinsoo's. If the enemy has many heroes with invisiblity and/or no one in your team is getting Book, go for it. This also gives you something to do during Shackles.

Luxury - Aghanim's and Heart.

--- Strategy ---


General

Laneing - Never solo. Ever. Rhasta is an Early to mid-game hero, and not laning with an ally totally wastes 40% of his potential. I recommend you lane with a high damage dealing spell caster. Perhaps the best lane partner for you is the Juggernaut. Have him start of with a pack of Tangoes and Boots of Speed. Shackle + Fury + Forked Lightning, and a kill is almost assured.
Forked Lightning is to be used only as a finisher if your ally can't finish of the enemy. Do not spam it, you don't have the Mana.

Ganking/protecting allies - Roam around the map in search of enemy heroes with a couple of mates to grab plenty of kills (ways to do this are discussed later). Remember, your role early is to gank a lot, while leaving the team carry to farm. Do whatever you can to save the carry, including Shackling the enemy so as to let the carry escape.

Usage of Spells


Forked Lightning - This has a casting range of 600, but it can extend upto 800. Aim for a hostile unit closer to you than the target if the target is far away.

Shackles - Do not use this if the enemy creeps are attacking you. You are more likely to die than your target if this happens. Timing is key here. Capture heroes once most of the enemy disables and ministun spells have been used up.

Voodoo - Target the biggest threat to your team. Sometimes it would be wise to Voodoo a disabler and then Shackle your main target.

Mass Serpent Wards - Warding and immediately Shackling is no brainer. Once you do this, double click a Ward and order the group to attack your target.
Wards can also be used to block of escape routes. They can also block enemies from getting at you while escaping.

Ward Trapping - This tactic involves some skill to pull of correctly. Basically, Blink (if applicable) up to the enemy and use Voodoo. Cyclone him and place Wards directly beneath the Cyclone (when the AoE selector turns red at the center). Now place them and wait for the enemy to fall in. Once they do, Shackle them immediately.
This can be done without Cyclone, just with Voodoo, but it is difficult and should not be your top priority.

Eul's Scepter of Divinity - Used for Ward Trapping, and to catch up with enemies.

Blink Dagger - Needed to Ward and/or Shackle effectively, as both the spells have a ridiculously low casting range.

Necronomicon - Summon before you Shackle the target. Proceed to destroy your helpless targets with your minions.

Guinsoo's Scythe of Vyse - Refer to Voodoo.

Read more.....

Banehallow - The Lycanthrope, Dota Hero Strategy Guide


Banehallow - The Lycanthrope
Range: 100 | | Move Speed: 295 | Primary: STR
Str: 22 + 2.75 | Agi: 16 + 1.9 | Int: 15 + 1.55
Damage: 53 - 57 | HP: 568 | Mana: 195
HP Regen: 0.91 | Mana Regen: 0.61
Attack Speed: 1.43 (+ 16% IAS) | Armor: 2.2

The first thing, this is my first guide (Mojo’s Guide) in DotA thanks to GrapeZ who show me how to play lycan. I never play lycan before, because I think he doesn’t have stun or any disabling spells and he can’t blink or windwalk. He just have 2 wolves “dolls” to play with and scare a little children or he can be “Midas” who wants to eat 3 little pigs wkwkwkwk… But after I see my friend GrapeZ play that lycan… Wow… And that change my perspective about lycan. And now I think… Lycan is one of the best heroes you can choose in DotA. He is a hunter, a pusher, a jungler, a chaser dan a killer… And He can KILL Roshan at Level 7… alone…

LYCANTHROPE SKILL

Summon Wolves (V)
Summons 2 Spirit Wolves to fight the Lycanthropy’s enemies. Lasts 55 seconds.
Level 1 - Summons 2 wolves with 17-18 normal damage, 1.25 BAT, 3 heavy armor, and 400 HP.
Level 2 - Summons 2 wolves with 27-30 normal damage, 1.2 BAT, 4 heavy armor and 500 HP; they also have 30% chance to deal 1.5x critical strike.
Level 3 - Summons 2 wolves with 34-40 normal damage, 1.15 BAT, 5 heavy armour, and 600 HP; they also have 30% chance to deal 1.5x critical
Level 4 - Summons 2 wolves with 43-49 normal damage, 1.1 BAT, 5 heavy armor, and 700 HP; they also have 30% chance to deal 1.5x critical, and permanent invisibility with 3 seconds fade time
Wolves can attack air and have 400 movespeed
Mana Cost: 125
Cooldown: 30


Howl (W)
An eerie loud howl grants an inner strength to all player controlled units and allied heroes.
Lasts 16 seconds.
Level 1 - Adds 11 damage to heroes. 4 damage to units.
Level 2 - Adds 22 damage to heroes. 8 damage to units.
Level 3 - Adds 33 damage to heroes. 12 damage to units.
Level 4 - Adds 44 damage to heroes. 16 damage to units.
Mana Cost: 15/ 20/ 25/ 30
Cooldown: 35


Feral Heart (E) [Passive]
Increases the attack damage and attack speed of the Lycanthrope and his units.
Level 1 - 10% bonus damage and attack speed.
Level 2 - 15% bonus damage and attack speed.
Level 3 - 20% bonus damage and attack speed.
Level 4 - 25% bonus damage and attack speed.


Shapeshift (F)
A Full Moon curdles the blood of the Lycanthropy. He transforms into a Wolf with extra hit points, 30% to deal a 1.5x critical strike, and increased attack speed (BAT from 1.7 to 1.4). This gives him and his units the ability to move at a constant maximum speed and not be slowed.
Level 1 - 100 bonus hit points, lasts 14 seconds.
Level 2 - 200 bonus hit points, lasts 15 seconds.
Level 3 - 300 bonus hit points, lasts 16 seconds.
Mana Cost: 100
Cooldown: 100/70/40

SKILL BUILD

Lvl 1: Summon Wolves
Lvl 2: Feral Heart
Lvl 3: Summon Wolves
Lvl 4: Feral Heart
Lvl 5: Summon Wolves
Lvl 6: Shapeshift
Lvl 7: Summon Wolves
Lvl 8: Feral Heart
Lvl 9: Feral Heart
Lvl 10: Howl
Lvl 11: Shapeshift
Lvl 12: Howl
Lvl 13: Howl
Lvl 14: Howl
Lvl 15: Stats
Lvl 16: Shapeshift
Lvl 17-25: Stats


CORE ITEM


Power Treads (STR) (1850) For basic movement speed, good attack speed, and the bonus stats will be helpful. I think Power Treads better than Boots of Travel because changing into wolf will max his speed already. Holding a TP scroll to get back to base to defend will take over the job of BoT even thou without the tele-to-creep privilages as i think it isn’t needed till lategame where pushing gets more and more important.


Vladmir’s Offering (2075) Lifesteal from Vladmir’s Offering is sustainable when fighting a hero. With the bonus damage aura, which synergies with Howl, it is a great addition to the team’s total amount of DPS. It is useful too when you are NC-ing with your wolves as they can sustain their life longer.

Black King Bar (3800)
I add this Item (BKB) into core item because we rarely meet our opponent without 1 or 2 disabler in their team. With strength and damage boost plus 16 second Avatar that will be enough to pawn those irritating disablers during your insane wolf form. The duration of 10 seconds of magical invulnerability goes almost smoothly with your Shapeshift duration.

OPTIONAL ITEM

Stygian Desolator (4420)
This item has a Great damage, and this item makes lycan to be the best hunting heroes and farming. And even better combined with Battle fury as it improves cleaved damage.


Assault Cuirass (6120)
GREAT attack speed and armor reduction(to enemies) and addition(allies) aura which helps ur team in battles and goes well with Desolator and/or Battle Fury.


Heart Of Tarrasque (5500)
Good damage addition and tankability for a STR hero. Able to sustain survivabilty as enemies may focus fire on you due to your dmg.
This build is GREAT for hunting down single heroes and enables you to take out 2 or 3 heroes in a major battle.It is also great for pushing as this build provides you to deal heavy, i mean HEAVY, DPS to your helpless enemies and towers. Sadly, its only flaw is that it is too single targeted.


Battle Fury (4350)
Other builds would be adding a Battle Fury to your inventory rather than a Heart of Tarrasque as there will not be much of tanking to do if your team has a great aoe disabler who r capable of bringing your enemies close to gather like Enigma or Magnataur. It is known that the cleave of Battle Fury is based on your main target’s armor, the items listed which minuses the target’s armor is crucial in dealing heavy damage. With a Battle Fury and your armor reducing items, you can clear a entire team with just a few nasty swipes of your paws.

Burizza ( )

This item can be very deadly. It has critical damage that synergy with vlad’s lifesteal witch boost your hit point to full in a secong and synergy with wolf critical damage so that almost ever hit you will see the red number from one or two even three wolf.

Radiance ( )

You can use this item if you have invincible enemies. Have great damage and the aura can reduce hit point other enemies. And the aura very usefull to chase enemies who wants to escape from battle. Just chase them and they will be dead.


HOW TO PLAY

Early Game : Get a Ring of Basillus and Tangos. From level 1 to 3 you can join your teamate in a line (this is faster to gain level 3 in a line than you have to wait noob camp to spawn 3 times). Level 3-7 Neutral Creep your way to a Power Threads and a Vladmir’s Offering and try to get Black King Bar When you get your lvl 2 Summon Wolves, go to Ogre (lvl 3)or Mud Golems (lvl 5) or Dark Troll (lvl6). After level 5, you are now able to kill Centaurs or Furlbogs, but dodged their Claps or Stuns. Just farm farm and farm your way to succesion on owning the game. And if you want you can solo ROSHAN at level 7 with full mana and hit point and your item already boots and vlads. Summon level 4 wolves for 3 times and you can say bye bye to Roshan. After you kill ROSHAN continue to 1 or 2 NC-ing and you will arrive to Level 9.

Mid Game : Level 9, your team is bound to gank enemies, and Howl will be helpful in successfully eliminate the targeted hero. You should be doing some hunting of heroes yourself. Pick out those heroes who dare to farm themselves without their teammates around. If your best enemy is Tanker, get Deso or Burizza and Assault Cuirass. If your teammates is mass disabler, get Battle Fury. The item build depending on your opponent’s team line-up.

Late Game : Walk with your team to push down their tower, one after another, alternating lanes one at a time and pick out Disablers (e.g. Lion, Rhasta) heroes first. Then the Carry hero (e.g. Troll Warlord), then finally the Tanker (e.g. Centaur).

And that’s all for now… This may not the best Guide but it can helps you to win… Thanks for read this Guide and i hope you can help me to review any flaws… by send me your comment…

Read more.....

Using your hero to its full potential, Dota-Allstars Strategy Guide

Introduction

This guide aims to help players of all skill levels get the most out of their hero. Basically, doing everything you can in any given situation. It will discuss things such as proper skill usage to maximize damage dealt, optimal chasing tactics, survival tactics, and other various tactics. In every single game, you will encounter situations where you can utilize these techniques, and it is in every player’s best interest to make the most out of these situations. It makes logical sense to do everything you can to ensure that no marginal escapes or deaths happen. If these marginal cases do indeed happen after you’ve done everything you can, then you will not have any regrets afterwards. You will no longer have to bang your head on the desk after letting your target escape with 10hp, and you will no longer have to curse at your monitor every time you get killed in a poorly fought battle.

A lot of these tactics are overlooked by a lot of players, and people who know these tactics may not use them because they may, or usually forget to. It’s a big mistake to dismiss these techniques as useless, as these little things can add up to make a big difference in the game, especially during early and mid game.

The Basics

There is a popular saying: “Information is Power”. Not only does this saying apply to situations IRL, it also applies to DotA. The more information you have, the better you will be able strategize and formulate your plans. There are two kinds of information: Explicit Information, and Implicit Information. Explicit Information refers anything that any player can know at any given time in the game. These include things like spell damages, mana costs, and cooldowns, game mechanics, and what items each player has. Implicit Information refers to things that one has to pay attention to in order to figure out. This includes things like a player’s play style, tendencies, actions, and their skill build. For example, if you see a Pudge move over to the side, you can deduce that he is going to aim a hook at you. If you see a Zeus with an extra +2 stats on all attributes at level 2, you can conclude that he is doing a bolt/stats build, and will not have arc by at least level 4.

Sometimes, I like to try and guess my opponents item without highlighting their hero. Of course, it’s not really possible to guess items such as Bracers, point boosters, etc… but it is very possible to deduce whether they have Boots of Speed, Power Treads, or Boots of Travel. You can also tell if they have any magical resistance, and possibly which damage item they have (Sacred Relic, Crystalys, etc…). These small observations may come in handy in those fights where you are too preoccupied with controlling your hero to highlight your opponent’s hero.

The more you know, the better off you will be. If you can tell me the approximate cooldown, mana cost, and damage of level 2 magic missile out of your head, then you probably have enough Explicit Information stored in your brain. If not, play more and pay attention to these subtle details. Implicit Information requires in-game observations, and you should constantly be searching for it in your lane. If you know exactly what you’re up against, you will know how far you will be able to push your hero to its limits at any given time.


Using Waypoints

The shift button is a wonderful thing. By holding down shift, you can queue up commands for your hero to do one after another instantaneously. This applies to move commands, attack commands and spells. However, some spells have a long animation to it (i.e., CM’s frostbite), so it is better not to use shift for those spells. You are better of manually cancelling the spell with a move or attack command. Again, it is very useful to have the Explicit Knowledge regarding which spells have these “lag” properties. Now, why is this important? Here are a few situations where proper usage of waypoints will come in handy.


IPB Image
Tango Juking


You can hold shift, eat a tree, and issue a move command afterwards. You hero will look like it eats the tree while moving. Using this technique will ensure that the distance between you and your chase does not get any shorter. Your opponent will not be able to get a hit in on you (assuming equal or near equal move speeds), or get within casting range of their spell. It also allows you to move into the fog of war faster, so if his spell just finished cooling down, he will also not be able to cast it on you.


IPB ImageIPB ImageIPB Image
Cyclone, Purge, and Hex


So you’re chasing an enemy and you have one of the three items above. Hold down shift, cast the item on their hero, and issue a move command forward. Right when your hero gets within casting range of the item, cyclone/purge/hex will come out, and your hero will keep on moving forward, minimizing the distance between you and your enemy. This allows you to get in extra hits, thereby maximizing the damage dealt to your opponent.

This also applies to situations where the enemy is chasing you. Hold down shift, move to a spot further up ahead so your hero keeps running, cast the item on their hero, and issue another move command in the direction that you’re running. Your hero will gain valuable distance on the opponent, and the extra time it buys you can make a difference in determining whether or not you die (especially against heroes like specter, bloodseeker, Spiritbreaker, etc…).


IPB ImageIPB ImageIPB Image
Channeling Spells


In the case of Sand King, many people know how to shift-queue epicenter in conjunction with Kelen’s Dagger. However, if you do not have Kelen’s Dagger, then you have to rely on your burrowstrike/epicenter combo. After you burrowstrike in and start channeling epicenter, hold down the shift button and issue a move command in the direction where the opponent is going to run. This ensures that everyone who is initially in the range of epicenter, stays in the epicenter. Similarly with Pudge, hold shift down while dismembering, and issue a move command in the direction where the opponent is going to run. This maximizes the disabling time of dismember, as well as the damage. It also basically guarantees that your target will not escape the slow from your rot.

For Rhasta, you can shift-queue your disables to maximize the duration of shackles. While channeling shackles, hold shift, press D, and click the hero. After shackles is over, your hero will automatically cast hex. This ensures that a blinker, for example, does not get away from you, or ensures that the target hero will not be able to cast any spells to disable, or damage you.


IPB Image
Bottling/Grabbing Runes


In those cases where you come across a rune while you’re being chased, queuing up a move command after you bottle/grab the rune will enable you to keep a distance between you and your opponent. I’ve seen many cases where people have come across a haste rune, only to stop for a split second after they get it, and die from a storm bolt coming from Sven who got into cast range in that split second.


IPB Image
Teleporting to Towers


A lot of people know that you can time a TP shift-deny a tower. However, what if there are 3 heroes banging away at the tower, and they start positioning themselves to stun you the instant you TP over? You may be able to deny the tower, but you will die in the process. Now… suppose you are playing Stealth Assassin. Instead of TP denying the tower, you can shift cast a Smoke Screen after you TP. Follow that up with another command to deny your tower, and another to move your hero out of harms way. Be creative, and add in extra commands (whether it be a cyclone, hex, echo slam, etc…) when required to.


Optimal Chasing/Ganking tactics


Animation cancelling, hitting, and spacing

You should always always animation cancel spells and attacks during the early to middle game phases. At this point in the game, a single hit can mean the difference between a kill and an escape. As the game goes on, heroes do more damage, and this becomes less and less of an issue.

When ganking somebody from behind, do not open with a stun unless the target hero has a spell that can screw up everything (i.e., windwalk, fissure, reverse polarity, etc…). You should always try to move close to the target, and get in couple of hits while your target is running away. Wait until they approach the cast range of your stun before casting it. As for nukes or spells with short cooldowns (blink strike, for example), use them ASAP and follow their hero. Better yet, if you can block the enemy’s path by moving into it (like creep blocking), do it. This will allow your allies to get in more hits as well. If you can, try to squeeze in couple of hits, but remember to stay within range of your spells so you can cast them again after they have cooled down. Don’t just right click the enemy, as you will lose precious distance.

When ganking heroes with a built-in escape mechanism (Void, Clinkz, BH, etc…), you need to chain stun them. This is the process of casting stuns in succession, while trying to maximize the duration of each stun. Against heroes without an escape mechanism, use the tactic mentioned above. Try to get in as many hits in as possible in before initiating, in between spells, and while chasing. This will help conserve your mana so you can use it on other heroes later on. Remember to animation cancel!

Also, pay attention to the space between heroes. If 3 melee heroes decide to gank a centaur, and all 3 of them right click the centaur at once, the centaur will hit all 3 of the heroes with stomp, and run away unharmed. Try to space yourselves out so it is harder to hit multiple heroes with a single spell like impale, hoof stomp, or light strike array.


Taking advantage of the terrain

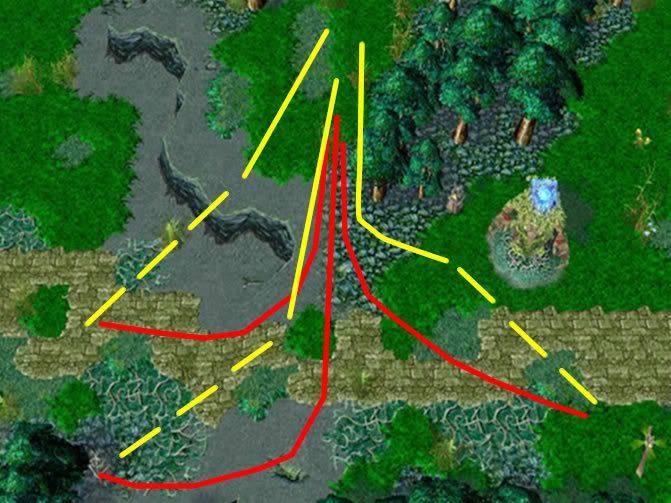
If the enemy managed to get out of range of your spell, don’t worry! If your hero has any spell that can be cast in a line, or a spell that targets an area in front of it, then you still have a chance to catch up. Examples of spells that have this property are Shadowraze, Dragon Slave, Carrion Swarm, Meat Hook, and even Impale. On the DotA map, there are a lot of corners to turn, and due to the shape of the corner, the distance between you and your target will decrease once they cut the corner. For example, take a look at this spot.

IPB Image

The red line indicates possible paths that your opponent will take. The yellow line indicates the path you will take in response to the path the opponent will take. The dotted portion of the yellow line indicates how you would cast your line spell to hit them. As you can see, no matter where your opponent decides to run, the distance between your hero and his will decrease. Therefore, don’t give up when the hero runs out of your range. If you them approaching a corner that they’ll have to cut, keep on chasing and you may be rewarded.

Breaking invisibility

Many people break their invisibility with a spell, which is not the optimal choice to make. Using the concepts discussed 2 sections earlier, it would be best to move close to the hero, get some hits in, and then use your spells. Suppose you are playing Vengeful Spirit and you pick up an invisibility rune. Instead of stunning your target right out of invisibility, you walk right beside your target, hit them twice, and then use your stun when they begin to retreat. Coupled with animation cancelling, hitting, and running, you’ve earned yourself 2 free hits in the beginning! It may not seem like that big of a deal, but if you decide not to do it and your target ends up getting away 1 hit from death, you can go on ahead and shoot yourself.

On a side note, while playing Stealth Assassin, the same concept applies. Before initiating your attack by casting Smoke Screen on your opponent, backstab them once or twice before doing so. People can’t react instantaneously to your attack, so take advantage of this as much as you can.


Ganking multiple heroes

Let’s say you and 2 heroes are going to gank 2 opposing heroes in bottom lane. This is going to be a 3v2, so your team has the hero advantage. The optimal strategy here would be getting 2 of your team’s heroes to focus down one hero, while the last remaining hero (the one who can stall the most time, or who can keep the enemy within striking range) goes after the other one. For example, a Rhasta or Lion with/without cyclone, Vengeful Spirit, Pudge, Drow, or Bane Elemental would suit this role perfectly. After your 2 teammates get rid of the first hero, you have kept the second one there waiting for them to come for the kill. Basically, DO NOT go all out on one hero, because there is a good chance that the other one will escape.


Various Battle Tactics


Using creeps

Creeps can very well decide the outcome of the battle. During early game, the damage output from 3 creeps is equivalent to another hero. Therefore, you want to try and fight those close battles with creep advantage, meaning that you have more creeps hitting the enemy than he has hitting you. It is best to get to the point where you have this sixth sense of knowing whether or not you are going to win the battle when trading hits with the enemy, with and without creep advantage. That way, you will not be missing out on any opportunities to kill the enemy.

You also need to be careful when running/chasing into creeps. If you suddenly run into them when retreating, they may stall your movement enough for the enemy to catch up and land the finishing blow. If your opponent’s creeps block you when you are chasing them, you may very well lose out on the kill. A good way to manage this is to pay attention to the minimap, and see how far the creep spawns have travelled across the map in your lane. You can figure out when you are going to run into them, and avoid them completely.

Path Blocking

I briefly mentioned path blocking back in the optimal chasing tactics section of the guide. I stated how it could be used to make the most out of offensive siatuions. Keep in mind that path blocking can also be used for defensive purposes as well. If your ally is getting chased by an enemy and you cannot do anything to help them (whether your stun is on cooldown, you have no mana, you have no stun or slow, etc...), one option would be to run into the opponent’s path and block their hero from getting any closer to your ally. If done properly, this may prevent your ally from taking any additional hits, and it may prevent your opponents from getting in range for that finishing nuke.

Of course, you have to be careful when attempting this technique. The opponents could very well just switch their target onto you instead. You need to be able to survive their combos, or else you will end up dying instead of your ally. If you have a natural escape mechanism like blink, invisibility (windwalk, lothars, bottled invis rune, permanent invisibility, etc...), you should not be afraid to do this.


Experience, and level ups

In order to use your hero to its full potential, you need to maximize all the benefits that your hero receives throughout the game. This includes things like creep kills, and gaining as much experience as possible to level up. Remember to try and stay in range of all creep kills and hero kills. It sounds easy in theory, but in practice, I seldom see players trying to get in range for the hero kill XP. Specifically, when players are getting chased and they are near-death, the only thing that’s on their mind is getting the hell out of there. When reinforcements arrive, they just keep on running away, even when it is apparent that the chaser is going to get killed by your allies. You are going to be missing out on a huge chunk of XP that is non-recoverable. I have also seen situations where Venomancers uses Poison Nova and Shadow Strike to kill an enemy hero, but not follow them to their deaths for the experience. Yes, following too far may lead to you getting ganked and all, but on the other hand, there are times where it is perfectly safe to do so. Take into account things like how far you are in enemy territory, how many heroes are missing on the minimap, and use your own judgment in the game.

There are going to be times where you fight a battle when your experience bar is almost full. If you are fighting near anything that is going to die and give experience, you may level up. During early game, a level up gives you enough HP to tank one more hit. Whether you are going toe-to-toe with a hero, or chasing behind a tower for a kill, this ability to tank an extra hit has the potential to save your life. Try to factor this into your calculations when deciding which battles to fight, instead of relying on luck.

There are also going to be times where you will level up in the middle of a battle. Keep in mind that you do not necessarily have to stick to your originally planned skill build. For example, if you are playing Rhasta and you have gone shackles/fork/fork/shackles up until level 4. After you use shackles and fork to kill one hero, another one comes up from behind. You have 150 mana left, and are very close to dying, Instead of sticking with your original build and learning forked lightning, take a level of voodoo and hex your opponent. That way, you will be maximizing your chances of survival.


Spacing, and the fog of war

Proper spacing is an art. The ability to constantly position yourself in an advantageous way is a very valuable asset. Proper spacing allows you to minimize damage taken, while maximizing your potential to tank as much damage as possible. For example, staying out of the attack range of an enemy hero minimizes the damage you take. Timing your escape so you run out of their attack range 1 hit away from death is pushing the limits of your hero. If you have a haste rune, this becomes a lot easier to do. Spacing is best utilized in conjunction with the fog of war. As long as the enemy loses vision of you, you cannot be targeted, and you are safe for the time being. Make the most out of the situation, and don’t be afraid to re-engage the enemy.

Ranged vs. Melee

Ranged heroes have a natural advantage over melee heroes. They do not have to travel as far in order to be able to hit their targets. This advantage can be heavily abused when ranged heroes are running away from melee heroes. When you are playing the ranged hero, you are able to fully take advantage of spacing, and the fog of war. When the melee hero is chasing you, you can just run out of their vision and hit them at a safe distance since the melee hero has to target you again. When the melee hero gives up chasing, your superior range enables you to turn around and get in some free hits. If the ranged hero happens to have a slow, by golly, the melee hero won’t be able to do anything (assuming he is relying on physical attacks). Maintaining proper spacing in this situation is crucial to getting the most out of your hero, as you want to maximize your damage output, while minimizing damage taken. Throw in a haste rune into the mix and you will be pretty much untouchable.

Dealing with heroes who can kill themselves

Heroes like Centaur, Pudge, Abbadon, and Bane Elemental can kill themselves with their own skills after their HP drops below a certain point. Many players will attempt to deny you gold and experience when it is apparent that they are going to die. When you are chasing these heroes, you need to keep in mind that they can kill themselves, instead of mindlessly watching your hero attack them. If you have finishing nuke or stun, save it for the finishing move after your attacks bring them down to a certain point. If you do you not have a finisher (or do not have the mana for it), then you must attack them to the point a bit before they attempt to suicide.

For example, let’s say you are chasing a Pudge with a Faceless Void, and he is at 90 HP. You don’t have mana for chronosphere, but you have enough for timewalk. You decide to timewalk over to slow him down. If you hit him once, it is likely that Pudge will turn on rot and will suicide himself. What you should do in this situation is to fake an attack (press “S” in the middle of the attack animation), and try inducing your opponent to start using rot. If he does, then wait until his HP drops low enough for you to kill in 1 hit. If he doesn’t, then it’s likely that he isn’t even thinking about denying you the kill. Proceed to attack him if the latter is the case.

Conclusion

Throughout this guide, I know I’ve said a lot of things along the lines of “this may be the deciding factor whether blah blah blah…”. It may not seem like that big of a deal, and in most cases, it usually won’t be. However, it doesn’t hurt to keep in mind all these tactics, and to always do them. That way, you will never have to look back on a situation and ask yourself “What if I did something different back there? Could I have actually survived that situation?” DotA is a very dynamic game that requires you to make many decisions in the spur of the moment. The amount of time you have to make your actions count is very limited, so make the most of it.

If you see a player doing all these little things in the game, you can conclude that they are probably very experienced, and are decent players. Knowing how to utilize your hero to its full potential is the basic foundation for getting better at the game. A lot of other concepts like mindgames, risk taking, being a team player, and response hacking, develop a lot on these basic concepts. It also depends on your own ability, and courage, to push your hero to the limits.

Thanks for taking the time to read.

Read more.....

Morphling - Dota-Allstars Hero Strategy Guide


The Morphling has been one of my favorite heros ever since I started playing in version 5.34. At first glance, he looks very complicated and intimidating to play but once you figure him out, you’ll see that he’s incredibly versatile and fun. Hopefully after reading this guide, you’ll be well prepared to play him :)

Skills and use of them:

IPB ImageWaveform - One of the best non-ulti skills in the game. It is a skill used for chasing, escaping, damage dealing and so on. It has the flexibility of blink, several times the damage of blink strike, and a pretty low cooldown.
It is a burrowstrike without the stun, but since you are ranged it evens out.

IPB ImageAdaptive strike - Deals damage based on your agility, at least with the build of this guide, so the skill is not very good in early game when your agility is low, and as most single damage spells is loses its potential as the HP of the heroes grow in late game.

IPB ImageMorph - Makes you able to shift between your STR and AGI. In this guide, the focus won't be on constantly developing after the circumstances and you won't have mana for it. You will mostly need it to get your agility as high as possible. Of course, if chased, you might find it useful to get some bonus STR of waveform is on cooldown.

IPB ImageReplicate - As I see it, replicate is somewhat a "displaced" spell in the reportorial of Morphling. As it is yourself you are gonna deal the damage with, the potential of a clone of another hero looses its potential.

Skill build:

1 - Waveform
2 - Stats/morph
3 - Waveform
4 - Stats
5 - Waveform
6 - Stats
7 - Waveform
8 - Stats
9 - Stats/morph
10 - Replicate
11 - Stats
12 - Stats
13 - Stats
14 - Stats
15 - Stats
16 - Stats
17 - Replicate
18 - Replicate
19 - Morph
20 - Morph
21 - Morph
22 - Adaptive strike
23 - Adaptive strike
24 - Adaptive strike
25 - Adaptive strike

Reasons and justification:

Waveform asap should hardly be questioned. It is after Morph what makes you so good, in early game as damage, escape and chase, and later on as escape and chase.
Though this is not a Morphling guide focusing on highest stats, we still need the stats very much indeed. They make it possible to use Waveform much more often than otherwise, and are necessary for your survivability.
We only take one point in Morph, as it will be used primarily for get your agility sky-rocket, you need the stats more, so Morph should be taken at level 2 or 9. If facing easy early game opponents and/or having a good supporting ally in your lane, you can take Morph early in level 2 to make your harassing and last hitting easier. Especially if facing a single melee hero without more than one nuke, you can drop your HP down to about 400, just watch the map and count the foes often... If facing a nuker or more than one disabler, shifting to low HP might prove very "unpleasant" and will probably result in many trips back to fountain or, worse, deaths. In this case, you should not take Morph before about level 9, when you might start ganking and have a higher HP.
The same reason for waiting with replicate. It won't be much use to have a image dealing half damage, especially in early game when the heroes have low physical attack. If facing an opponent and creating an image of him, he will most likely flee, and since you have no stun, you won't be able to prevent him from doing so. That us why you won't need it before the ganking starts. And since most battles last shorter than 15 seconds, especially in early game, you do not need to level it up higher in a while.
Adaptive Strike is a spell that need you to have high agility, which you do not have in early game, and when you reach late game and have it, you deal more damage with attacks. That is why we just save it for last, prioritizing stats, quicker morphing and longer lasting images.

Items and game progress:

Ok then, this Morphling is gonna use his morph ability to heighten his agility, hereby maximizing his damage output. Because of this, he need a bit more survivability. That is why I suggests the following as starting items:

IPB Image/IPB ImageStout shield if facing physical dealers, or RoR if nukers or a mix.
IPB Image1/2 sets of tangos
IPB ImageFill up the rest with branches =)

Head to your lane, Morphling is not among those heroes that need high EXP very fast, though you should avoid getting out-leveled, so you should do fine with a lane partner. You should also if possible avoid the mid-lane as the nukers will go there, left if sentinel or right if scourge will be best, because this is very your enemy's late gamers will go, and usually just one. As said before, if having easy foes, lower you HP and heighten your DPS, but to a reasonable point. To be able to do this more efficient, get a vitality booster as first item after your startings, or if having problems with mana and HP, get a bottle and then vitality booster. A vitality booster gives 250, which is more than 13 point in strength. So if buying it, you might shift 14 STR to AGI. In other words, you just bought 14 agility for 1100 gold instead of the 10 for 1000 or the 25 for 3400. See the logic? You should also try finish the vitality booster to a vanguard for more efficient HP, before buying yet another vitality booster, which you do not need to finish to vanguard. The damage block for the second will be lower, and the physical attacks higher so wasting more than 1000 gold on a 4 hp/sec and a small chance to block some damage won't benefit you. A third vitality booster has about the same price, and might be a better choice if facing many nukers. If you did well, you hopefully stood in your lane to now, probably getting some kills, if you went back, it might have been a good idea if you bought some boots then. If you did well, get the boots at the first time home as they aren't necessary since you have waveform, but they are helpful.

Later on in the game, you will no longer be able to get the kills waveforming in every direction like a maniac. This is when your high DPS from all the agility gets really useful. If having a good game, you can stay around with 1 in strength, getting HP only from vitality boosters and attribute bonus. You are still vulnerable, so now you have two item choices: Get HP and survive easier, getting some kills as you last the battle longer, OR get more damage and kill them before they kill you, simple as that. Personally I usually prefer the kill or get killed. In both tactics, your items will be Stygian Desolater and Heart Of Tarrasque. And pretty obvious, the Stygian for damage or the Heart for HP. No matter which you choose to go first, get the other after. Especially if going Stygian, you should try to gank or push with a teammate as you are pretty fragile for disables or ganks.

Other items:


Bottle - Because this Morphling has a pretty low mana pool and low HP bottle is pretty efficient on him. Especially the combo Waveform followed by bottle makes good. The bottle dispels on attack, but after the waveform, you will usually have some seconds before next contact.

S&Y - If having bad farming, this might be a good alternative if you are having problems farming and killing, it is an item boosting you overall and no parts more expensive than 1000 gold. And who cares if it is a noob item, it doesn't make it less useful. It gives both the STR and AGI that Morphling depends on, increased speed. It uses the orb slot at the cost of Stygian, but Morphling is one of the heroes benefiting most from maim as it has no other stun/slow and the high attack speed will trigger maim often.

Buriza - If the game for some reason lasts longer after the Heart and Stygian, this might be an alternative to heighten the damage from your high attack speed.

MKB - Same reason as Buriza, and also same purpose.

Treads - After the treads getting better and giving the much wanted stats, it is a good choice on Morphling as a quicker "morph", and it increases your speed.

BoT - Who doesn't love the flexibility from a teleport? If doing well, the increased speed and ability to be everywhere makes you much more efficient. But still, you do not need the ms from neither treads of BoT desperately, and if farming bad, you should consider staying with boots all the game.

BKB - Being fragile to disables and nukes, BKB may remove a lot of the weaknesses of Morphling, as adding some HP, though it sets you back in getting other survivability or damage items

Skadi - Of course a good item on Morphling, but that is the stats Morphling, not my killing machine =)

Butterfly - More or less just boosting his strengths further, but not increasing HP against spells though. With his high armor, he hardly needs the evasion, and butterfly is expensive, but still efficient on him.

HoD - Not very good, unless there are many chain nukers against you. You will have HoT for 11 HP/sec and Vanguard for 4 HP/sec. And it doesn't protect you from disables either.

Linken's - As a weaker BKB, but it provides you with stats instead.

Satanic - If you have good DPS this item, being an alternative to Hot, keeps you more or less alive as long as you attack, but it removes the Stygian, and therefor put your DPS back. It should only be taken in special occasions, though I do not know which that would be tongue.gif

Vladimirs Offering - Should be pretty obvious to not be a choice, but by some obscure reason, some people actually take this... I would think going Aghanims Scepter and Refresher Orb on SA to be a better choice, but still there are some maniacs out there taking it on Morphling...

Nice, but still realistic, finishing items:

IPB ImagePower Treads
IPB ImageHeart of Tarrasque
IPB ImageHood of Defiance
IPB Image
IPB Image
IPB Image


Special marks:

*One thing about replicate being underestimated and also the main reason I take i at all that early is that you may at any time teleport to the clone, replacing it. If you are being chased, replicate a hero, doesn't matter much which, but preferably one with high MS. Run away from your chasers, but send the clone in the opposite direction. This will not only confuse them, but giving you a superior way to escape since you can replace the clone. Several times when I have done this, I get a lot of WTFs from the opposite team afterwards, as they do not understand how I just vanished. If they are more clever they will understand though, and you might get a "nice" from them instead, or better...a "FUCK YOU BLOODY NOOB GOD DAMN IT!!!11", it feels so good. biggrin.gif And if you reply with "How does me killing you make me noob?", you will probably see the message "*NickName* has left the game.", which makes the day, seriously!
And, even if they know the possibility for you to replace the clone, who will actually drop you and follow the clone if you make one and send it away? Of course, if they do, run freely, but that will most likely not happen. Still, of there are more than one chaser, and they are well organized they might split up after you and the clone, but even then, you did at least half the chasing strength, and if being strategic, kill one of them, which feels REAAALLY good indeed! ^^

*Waveform is an extremely underestimated spell. It is as I said before a blink, but better. You might shorten your way by about 1000 range instead of run, but also shorten it by waveforming straight forward instead of running around something, like edges, trees, units, you name it.

* If running away from enemies, or better A enemy, and having plenty of mana, heighten your strength and now and then turn back and shoot at him to make him follow on. When running up a ledge, turn to the side, and as the enemy gets up too, he will probably not attack you immediately and there will often be some seconds delay of free fire for you. Now, waveform past him to his most likely escape route, BUT NOT OUT OF SIGHT, as this will mess up for you. Get some more blow on him, unless he is a very high HP hero, and you pretty short, or if he is just stupid, he will now turn and run away, and you are free to take him down biggrin.gif

* You are not a tank. That is pretty obvious, so if going against more than one enemy or against a chain disabler, do not go alone. You deal a hell lot of damage, but it helps little if they kill you first. The best that can happen is that the enemy flee. You can chase most heroes, except other blinkers, due to your waveform and your high DPS makes the execution go quick.
In team battles, you are the person who enters LAST as the enemies will most likely, and wisest, focus you. So you need friends in front of you. Waveform to your own attack range, but not in the middle of the chaos, this is a place for tanks and stunners, not you.


Good friends and bad foes:

I am not gonna list the usual disablers as good friends, and disablers as bad foes, but I will remark that as most DPS agility heroes, you are very fragile when stunned/disabled/slowed, so try to avoid this. But there is four heroes I will list as pretty nasty, that is Venomancer, Lucifer, Axe and Bradwarden. I said that it is only about killing them before they kill you. But Veno And Luci may even kill you after you killed them due to their high Dot spells. And for Axe and Brad, their returns and high HP makes you lose pretty much HP while trying to take them down. And Brads Stomp and Double Edge lowers you even more, while Axe 3 seconds of mass spin with Call and his Culling Blade dealing about 50% of your HP is pretty unpleasant.

Read more.....